To create an Ubuntu 16.04 LTS live bootable USB you need a minimum 4GB USB flash drive, Ubuntu 16.04 iso and UNetbootin software. Using a live USB installation you can try out a lot of different Linux distribution on any PC or laptop that support boot from USB. This is the most easiest way to test drive any new or existing Linux version without requiring to burning a CD/DVD.
Ubuntu 16.04 LTS (Long Term Support) just been released recently with some new features and optimizations. This is the latest version of Ubuntu which will have support for longer time. The earlier version Ubuntu 15.04 does not have long support time. This article will help you to easily create a live bootable Ubuntu 16.04 on a USB flash drive. All the steps are described and required link is provided.
Requirements
- USB Flash drive (minimum size 4GB)
- Ubuntu 16.04 iso either 32-bit or 64-bit depending on your system from their website (I have used a 64-bit image for this tutorial)
- Get UNetbootin
Process
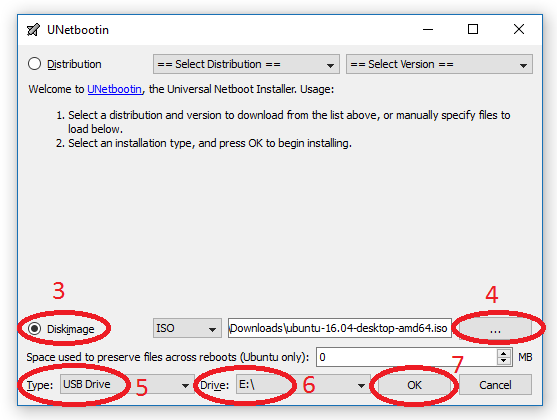
For easier to understanding I have included a screenshot for step number 3-7 below.
- Connect the flash drive to your computer and do a quick format using FAT32
- Start UNetbootin
- Select Diskimage
- Select your downloaded ubuntu-16.04-desktop-amd64.iso by clicking on the 3 little dots
- Type should be USB Drive, make sure it is not showing Hard Disk
- Select the drive letter that your USB drive is, in my case it is E:\
- Press OK once have completed all the steps above, it will take some time to extract and copy the iso file into your flash drive
When finished it will let you know. And, now you have a bootable USB flash drive with Ubuntu 16.04 LTS. To test it, just turn off your computer and select to boot from your USB drive rather than hard disk from BIOS or boot options.
If this article helped you please share it with your social network. Thanks very much for reading.


